Centurylink 10mb Internet Running at 3.1mb and .06 Upload?
Why wink DD-WRT on your NetGear R7000?
DD-WRT, due to it's open up source nature, comes with tons of functions you won't find on commercial router firmware.
A few advantages I actually liked:
– Fine tuning of your Wi-Fi (channels, signal strength, etc),
– VPN support (the Router will setup the VPN connexion!),
– DNSMasq back up (advanced DNS and DHCP functions),
– Realtime graphs, monitoring traffic 1 ach network connection,
– Enhanced Quality of Service settings,
– Scheduling for ethernet and both Wi-Fi bands,
– Samba build in (sharing files),
– etc.
With the electric current, very stable, version created and maintained by Kong, I've but establish ii weak points:
– Wi-Fi throughput is non as strong equally Stock firmware (although you might not discover during daily utilize)
– Wi-Fi connections occasionally "freeze", merely this could exist my lack of experience …
For more details see also the DD-WRT Wiki and this article at FlashRouters.
Annotation : There is at this time no Tomato Firmware available for the R7000, but perhaps in the near time to come a R7000 version can be establish at TomatoUSB.org. I'd most certainly try that one correct away when it becomes available!
Ad Blocking Detected
Please consider disabling your ad blocker for our website.
We rely on these ads to be able to run our website.
You can of class back up us in other means (run across Back up Us on the left).
Before we begin …
Some warnings and tips … and don't blame me if yous spiral up your router …
Warning and Fix (2019) – Newer NetGear Firmware actively blocking DD-WRT and the likes …
It seems NetGear has build in a machinery to block flashing your own firmware (see this discussion below) in the name of "security" (in other words: they don't like you tinkering with your ain stuff). Please read up on the matter and run across if in that location is a workable procedure bachelor in case you decide to buy a new R7000.
There seems to exist a working fix for this issue (confirmed to work):
R7000'due south are now (every bit of March 2019) preventing downgrades from the current Netgear firmware (1.0.9.64_10.2.64 every bit of this writing) which prevents the current (K3_R7000, build from 9/23/18).chk file from being uploaded via the Netgear web interface (this chk file has a lower version number, 1.0.5* that Netgear disallows).
Until a new Kong chk image is available, you can use this mod version that works around the result by providing a large version number (cheers to @jclehner).
Alert! Proceed at your ain risk!
Please exist aware that this activeness can brick your wireless router! A bricked router means that your router will be non-functional, 2 de-brick guides I've found, but didn't need: opening the router or soft de-brick.
The presented firmware is Simply SUITABLE FOR A NETGEAR R7000 !
Again: You're doing all this at your Ain gamble!
Caution! Before yous continue …
Earlier flashing a router, I follow these rules:
- Download the Stock Firmware of your NetGear R7000 so y'all tin can become back if needed.
- Downloaded the latest DD-WRT version for your NetGear R7000.
- Disable WiFi on the computer (desktop or laptop) that you use for flashing your router.
- The estimator y'all're using for flashing should exist wired to the router (ethernet).
- Brand sure the power source of your router and computer are reliable.
- Make a backup of your router's config.
- Make sure y'all have your Cablevision/DSL login info handy (if applicable).
- Clear the browser cache before and later on flashing.
- Reset the router always to default settings after flashing.
Going back to Stock Firmware …
Flashing back to Netgear Firmware is supported!
Just use the DD-WRT webinterface ("Administration" "Firmware Upgrade") and upload the stock NetGear firmware.
Exercise not forget to do a reset to Factory Defaults after going back (more details at the end of this article)!
File Formats: .bin vs .chk
Recently Kong changed the way he publishes new versions by using .bin files instead of .chk file.
A .chk file is needed for you first wink to DD-WRT, which is the "initial" version y'all can download hither.
After your router runs DD-WRT, .bin files tin can exist used to update it to the latest build.
Flashing DD-WRT on a NetGear R7000
Earlier nosotros start the flashing procedure, we first want to download the firmwares nosotros would like to have available even when we take no Net. In both cases these should be .chk files (you might have downloaded a zipped file, which you might want to unzip first). It may not be a bad idea to print this guide either – simply so you have it handy.
– Download: Latest NetGear Stock R7000 Firmware
– Download: Latest DD-WRT firmware for the R7000 – for all release bank check out Kong's webpage
You can download the files I have used from Tweaking4All, only with fast evolution of firmwares these days, I HIGHLY recommend using the two links in the list above.
Flash the Initial version Starting time when yous're still running NetGear firmware!
Download - NetGear R7000 Initial Chk
| Filename: | dd-wrt.K3-R7000.initial-chk.zip |
| Platform: | Undefined |
| Version: | initial |
| File size: | 19.8 MB |
| Appointment: | 2014-08-19 |
| Download Now Transport me a cup of Java | |
Download - DD-WRT NetGear R7000
| Filename: | DD-WRT-R7000-Kong-24760.nada |
| Platform: | Undefined |
| Version: | Kong three (24760) |
| File size: | 21.1 MB |
| Date: | 2014-08-02 |
| Download At present Send me a cup of Coffee | |
Download - NetGear R7000 Stock Firmware
| Filename: | NetGear-R7000-Stock-V1.0.3.56.cypher |
| Platform: | Undefined |
| Version: | 1.0.3.56 |
| File size: | 20.7 MB |
| Date: | 2014-06-07 |
| Download Now Ship me a cup of Java | |
Step 1 – Clear your Browser Enshroud
It might not be needed, but it's recommended by the developer of the DD-WRT firmware.
For Google Chrome, yous can detect it under the "File" menu (Windows) and for MacOS 10 under the "Chrome" menu.
Wiki How has a page that covers about browsers.
Step two – Go to your Router's admin page
Go to the admin folio of your router and login. The default admin folio for your router (a NetGear R7000) is: http://192.168.1.1
Which should piece of work, unless you really changed the default settings of your router's LAN configuration.
It's recommended to really use the IP Address of your router and not the router proper noun!
If this doesn't work, expect for the IP information of your network connection and re-create the IP address mentioned there for the "Default Gateway".
Windows: blazon in a DOS box the command "ipconfig".
MacOS X: Get to "System Preferences" "Network" and choose your active network connectedness.
Linux: blazon "ifconfig" in a shell.
Stride 3 – Uploading the DD-WRT firmware
Go to "Advanced" "Administration" "Router Update" and click "Browse" to select the downloaded DD-WRT firmware file and click "Upload".
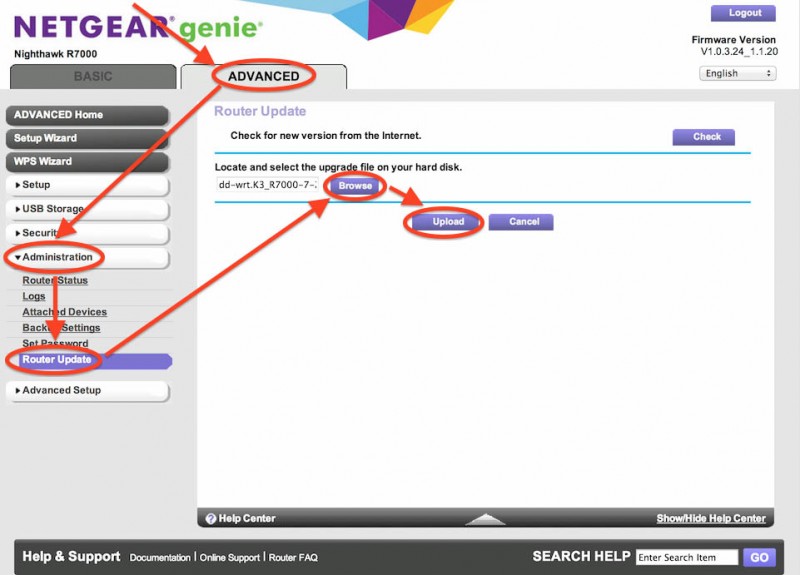
NetGear R7000 – Getting ready to upload DD-WRT
You'll get a "loss of Internet connection" warning starting time, just click "OK", and after that a comparison of firmware versions appears.
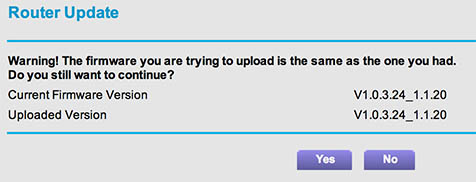
NetGear R7000 – Firmware versions compared
In my case it gave me the bulletin that both version where the same, which of course isn't true, but it might also tell you that they are different (more correct) or even older. Either style, don't worry, just make sure yous selected the right firmware file and if yous're sure click "Aye" to go along.
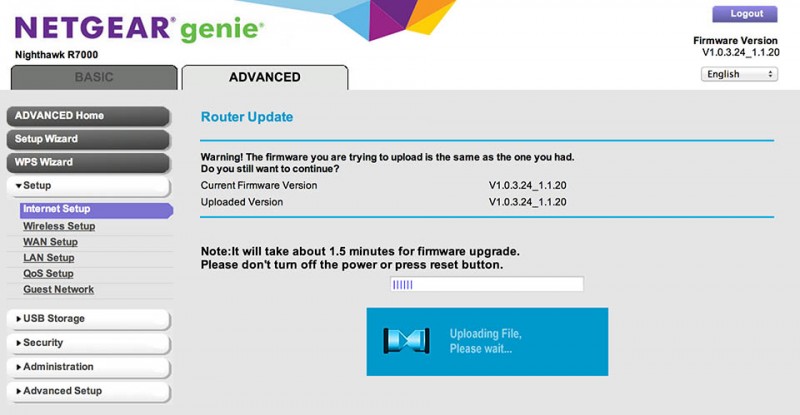
NetGear R7000 – Uploading DD-WRT firmware
One time uploading is completed, your router volition reboot:

NetGear R7000 – Rebooting …
Step 4 – First DD-WRT login
Later the reboot, the first DD-WRT login will appear where you're asked for a new username and countersign. Enter a new username and password to login.
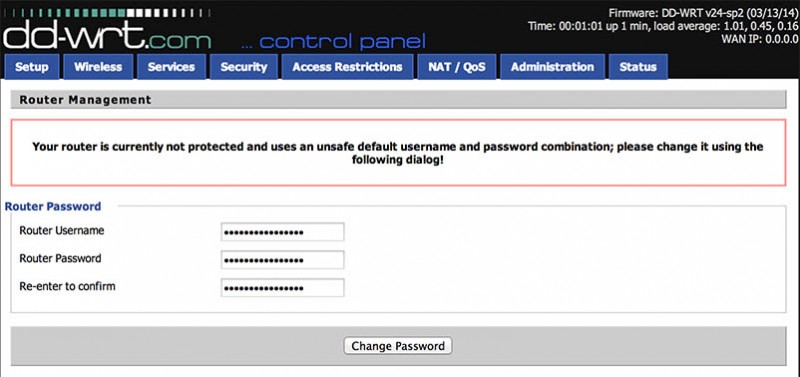
NetGear R7000 – First login for DD-WRT
Later the login you'll be presented the initial Arrangement Information of your new DD-WRT Router.
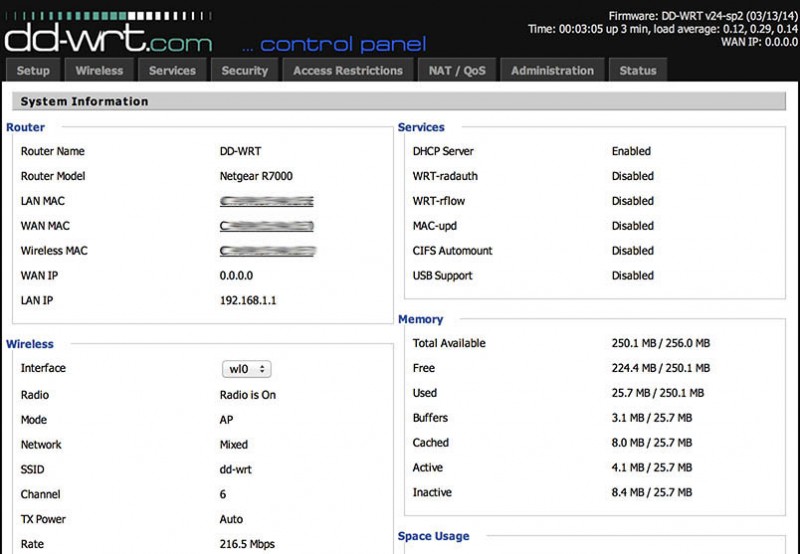
NetGear R7000 – Initial DD-WRT Info Screen
Step 5 – Router Settings to Factory Defaults
Now that we have access to our DD-WRT configuration, time to flush potential left-overs from the NetGear stock firmware by doing a Mill Reset.
From the master tabs, choose "Assistants" "Factory Defaults" "Yeah" "Apply Settings".
The factory reset volition upshot in a router reboot, and in some cases information technology might get stuck on a white page (http://192.168.ane.1/utilize.cgi). If the latter is the case, look a minute or so and try the default router address (http://192.168.i.ane) once again. The sequence of new username and new password has to be completed again.
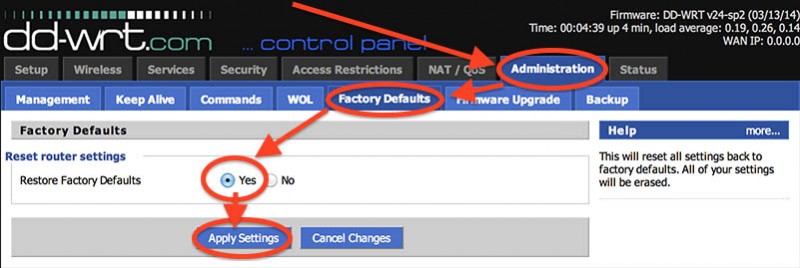
NetGear R7000 – DD-WRT Manufacturing plant Defaults
Step 6 – Basic Configurations Steps (WAN/LAN)
Later the router rebooted and y'all logged dorsum in again (with new Username and Password), time to practice some basic settings so we get out LAN, Wi-Fi and Internet going again.
Get to "Setup" "Bones Setup" and look at the "WAN Setup" settings.
This is where we, if needed, setup our DSL (oftentimes PPPoE) or Cable connectedness.
Do the settings needed for your Internet connections.
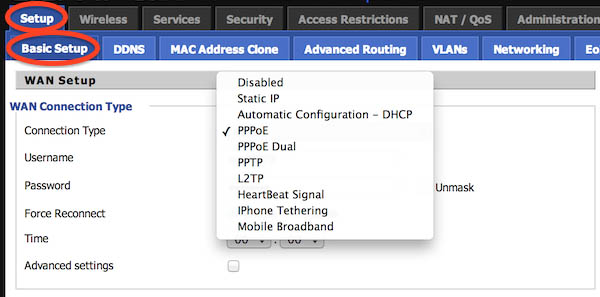
NetGear R7000 DD-WRT – Setup WAN
Adjacent we need to do our "Network Setup" (LAN) settings, which most likely are already done right. Verifying these settings however is never a bad idea.
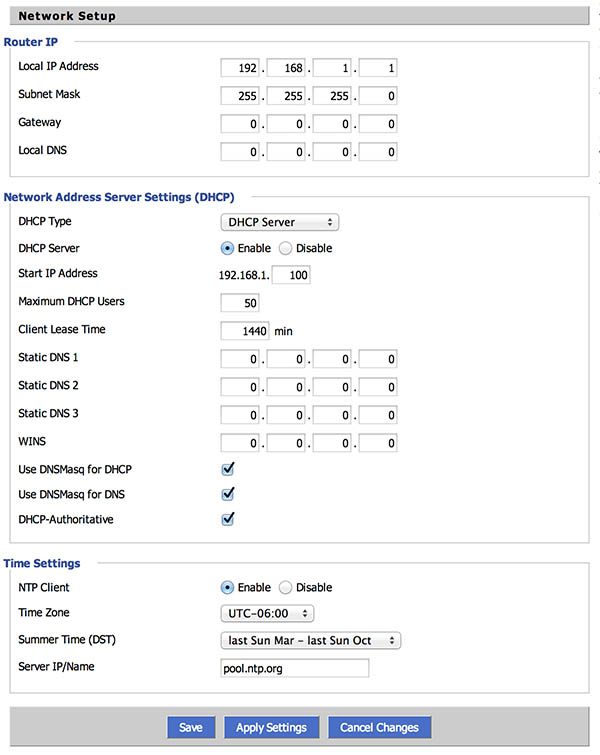
NetGear R7000 DD-WRT – LAN Settings
For your "Time Settings", those not used to using the "UTC" time: UTC tin can be seen as asynonym for GMT. If you're not sure about your timezone: cheque this website.
Some for examples:
– Us, Central Time (GMT-6) is UTC-06:00.
– Amsterdam, Central European Standard Time (GMT+1) is UTC+01:00
A commonly used NTP fourth dimension server (Server IP/Proper noun) would be pool.ntp.org.
After having done all your settings click "Apply Settings".
Step seven – Basic Configuration Steps (Wi-Fi)
Under "Wireless" "Basic Settings" y'all tin can verify your Wi-Fi settings. The default settings volition work only fine, only you tin practise some tweaking here, and you might want to set the " Regulatory Domain" to y'all area/country to make sure your equipment is not breaking any laws … or perhaps to do exactly that and boost your signals or channels used a footling. I was unable to find a clear listing of limitations or advantages for one domain over another (seems that Australia and Europe provide a amend signal than U.s.a., but that could as well just be coincidence).
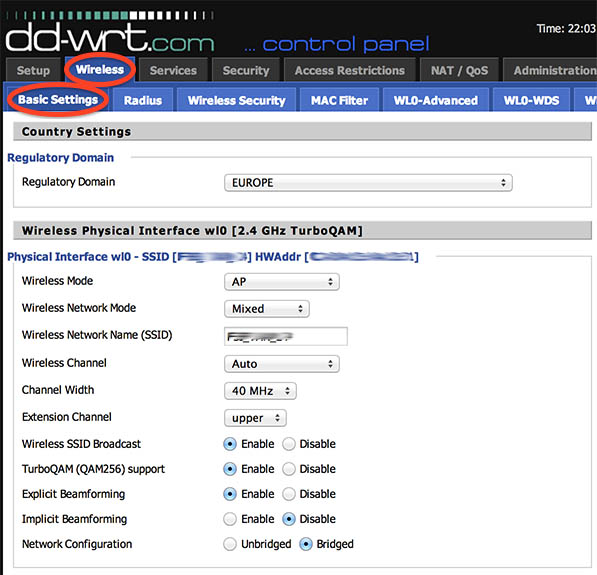
NetGear R7000 DD-WRT – Wi-Fi Settings
Note: Under the 5Ghz section, I noticed a stronger signal when using "Extension Channel" to one of the two "upper" channels.
Under the "Wireless Security" tab, security tin be set for each of the Wi-Fi interfaces (2.4Ghz and 5Ghz).
In my case, I take no equipment that has problems with WPA2/AES, then I've set up that for both.
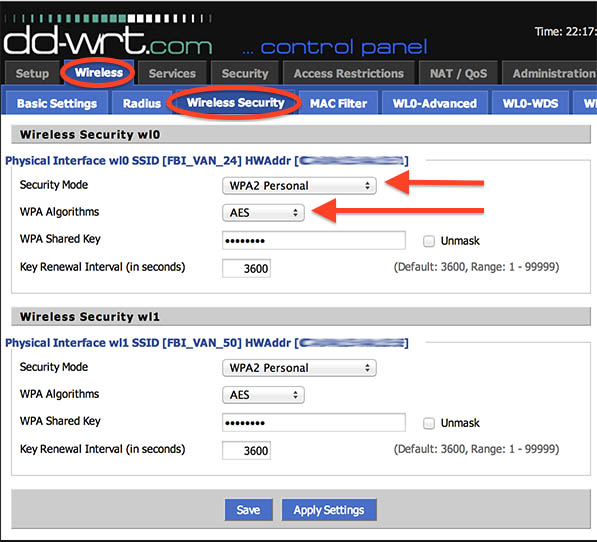
NetGear R7000 DD-WRT – Wi-Fi Security Settings
Step 8 – Port forwarding (optional)
Since DD-WRT can exist a piddling overwhelming when it comes to bachelor settings, it took me a little to detect where the heck to set up the port forwarding. Once I knew, it was piece of cake (of course).
Port Forwarding tin be establish under "NAT QoS", you lot'll discover options like private or range port forwarding, port triggers, uPNP, DMZ and Quality of Service settings.
More information tin be found on the DD-WRT Port Forwarding page.
Ad Blocking Detected
Please consider disabling your advertising blocker for our website.
Nosotros rely on these ads to be able to run our website.
You tin can of course back up united states in other ways (meet Support Us on the left).
Additional Tips
Flushing Previously detected Wi-Fi networks
Since I take my lazy moments, I use the same Wi-Fi SSID and password for either firmwares, which can crusade result on your computer. For example, my Mac does not seem to capeesh the alter and then the "remembered" Wi-Fi connections should be deleted and re-detected. On the other mitt; cheap "Made in China" IP camera's had not noticed the difference.
This could be necessary for all your Wi-Fi connected devices, like phones, tablets, etc.
On your Mac for example, go to "Organization Preferences" "Network", cull your "Wi-Fi" adapter and click "Advanced" (lower correct corner). In the list of "Preferred Networks", select your sometime connections and delete them.
DD-WRT: DNSMasq to Map Virtual Hosts (Apache) to the same IP Address
One of the master reasons to try DD-WRT was, for me anyhow, the use of DNSMasq and it performed better than I expected.
The situation I was looking at, is that I have a test web server, for in-business firm use just, running (actually on my QNAP) with multiple virtual hosts (see also: Apache documentation). Using virtual hosts allows you to run multiple web "servers" on just one unmarried auto.
Notation : QNAP virtual hosts are defined in the "Control Console" "Applications" "Spider web Server" "Virtual Host".
The problem still is that now multiple "servers" share the same IP-Address and most routers I have worked with do not let you to assign multiple names to the same IP-Address. DNSMasq howeverdoes allow you to do merely this, and the format is uncomplicated.
As an example, my test web-server (QNAP actually) has the IP Accost 192.168.i.100 and is named "cookiejar". Then typing http://cookiejar brings me to the default webserver page of my server, and the QNAP admin page can exist approached via http://cookiejar:8080.
On this server I take defined several virtual hosts, for example "multisite" and "testserver".
To define these in DSNMasq, go to "Services" "Services" and look nether "DNSMasq" where you discover a field called "Additional DNSMasq Options". Here we enter a line for each virtual host, in the format
accost=/<hostname>/<ipaddress>
In our hypothetical scenario:
                                                                                            1
2
                                                                            accost=/testserver/192.168.1.100
                      address=/multisite/192.168.1.100
Subsequently clicking "Apply Settings" all 3 "sites" translate to the same IP Accost. Apache yet volition handle these requests simply fine and therefor http://testserver/, http://multisite/ and http://cookiejar/ will all result in different websites, as if they were dissimilar servers …
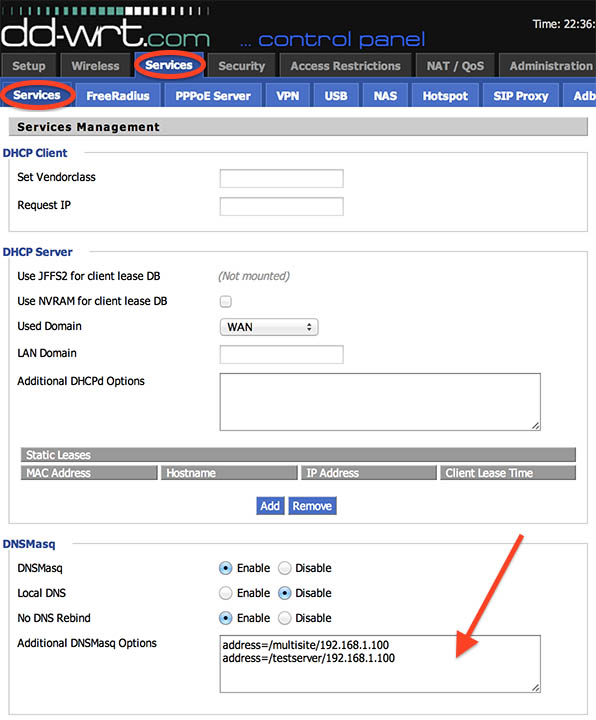
DD-WRT and DSNMASQ with Virtual Hosts for Apache
Going Back to Stock NetGear R7000 Firmware
Going back to Stock Firmware is really easy … during my testing I did go back and forth a few times, and for that reason I made a backup of all my settings in the Stock firmware and in the DD-WRT firmware.
In DD-WRT become to "Assistants" "Backup" and click the "Backup" button at the bottom. A file dialog will inquire you where to save it. This file, at a afterward fourth dimension can be retrieved with the "Choose file" and "Restore" role on this same page.
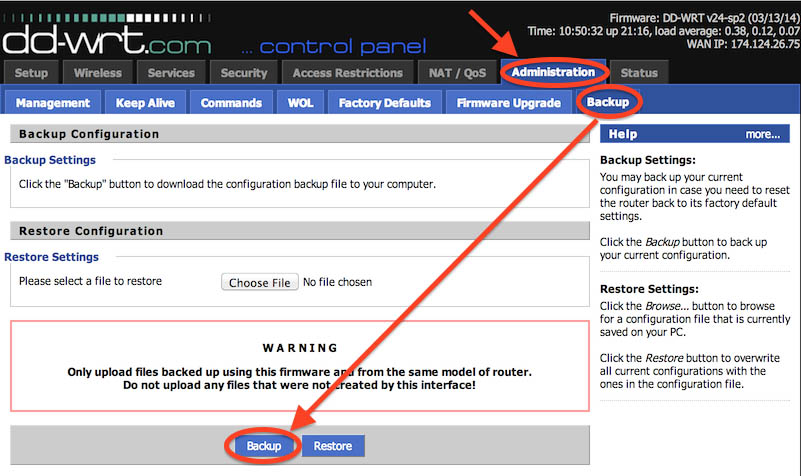
NetGear R7000 DD-WRT – Backup your settings
To restore Stock firmware, go to "Administration" "Firmware Upgrade" "Choose file" and select the latest NetGear R7000 firmware. Klik the "Upgrade" button to wink the official NetGear firmware.
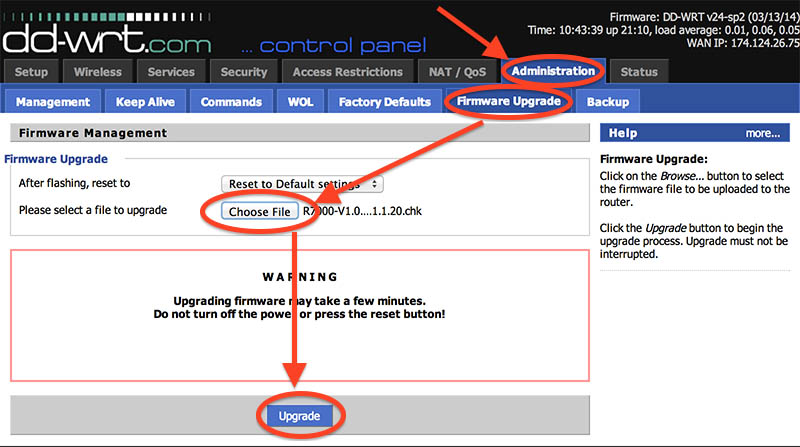
NetGear R7000 DD-WRT – Flash Stock Firmware
After the reboot, y'all'll meet a NetGear Genie welcome screen, which is not very helpful at this point (although strangely plenty the NetGear did connect to my DSL). Do a full factory reset and to do this nosotros need to printing and hold the reset push button on the dorsum of the fouter for at least 7 seconds (see: NetGear R7000 Knowledge base).

NetGear R7000 – Reset button
Later on the hard reset, username (= admin) and password (= password) have changed to factory default, which you'll need to login. Once logged in, go to "Advanced" "Administration" "Backup Settings" "Browse" and select the settings fill-in file you lot made before you flashed DD-WRT and click the "Restore" push.
Caution : These are the settings we backed upward style in the beginning under de original NetGear firmware – Not the DD-WRT settings backup nosotros just made!
Subsequently reboot all your previous settings will be back.
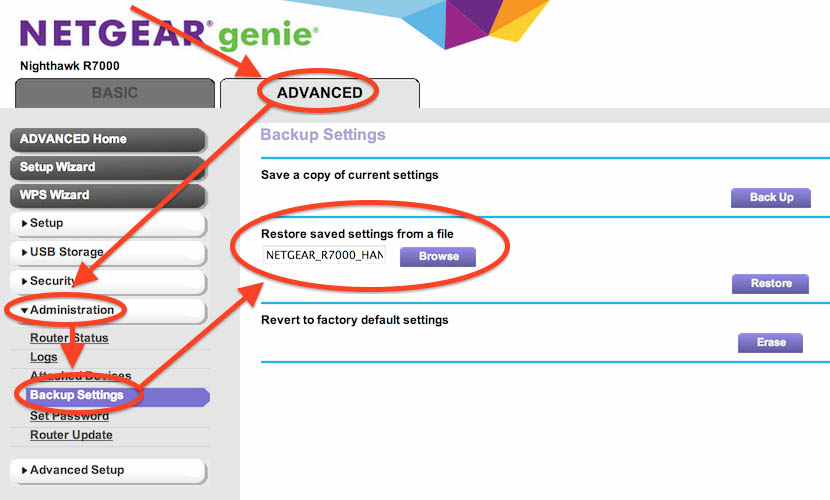
NetGear R7000 – restore previously saved settings
Source: https://www.tweaking4all.com/hardware/netgear-r7000-dd-wrt/